Blync VR App
After setting up your Blync device using the Blync Companion App and your bicycle following the setup guide, it is then time to put on your VR device and start riding in Blync. Blync VR app syncs the signals coming from your Blync sensors and uses that to get you biking in VR. Before getting on your bike with your VR device, make sure that the path sensor is ready to connect by pushing the reset button with the green LED turning ON.
Connecting to Blync
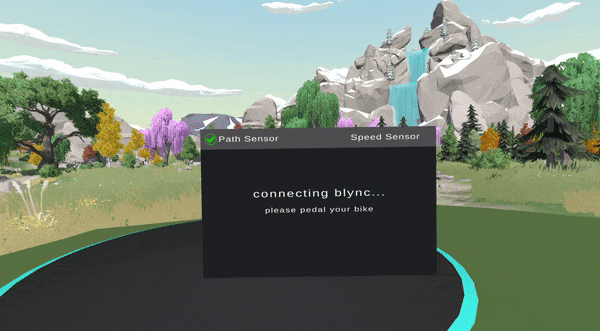
When you launch Blync VR app, after the loading screen, you will be presented with a screen where the app will try to connect to the sensors. The app first connects to the path sensor, after which it will prompt you to pedal your bike for speed sensor connection. Pedalling your bike wakes up the speed sensor from standby mode which will allow it to connect to the app. Once connected, you will next be taken to a character and bike selection screen. At this point, you can stop pedalling and use your headtracker to make menu selections.
Tip : If you are using blync for mobile phones, on the loading screen, there is an icon to switch between full screen or split screen VR mode. Also ensure to turn on your phone's bluetooth to enable connection to path sensor.
Blync Menus
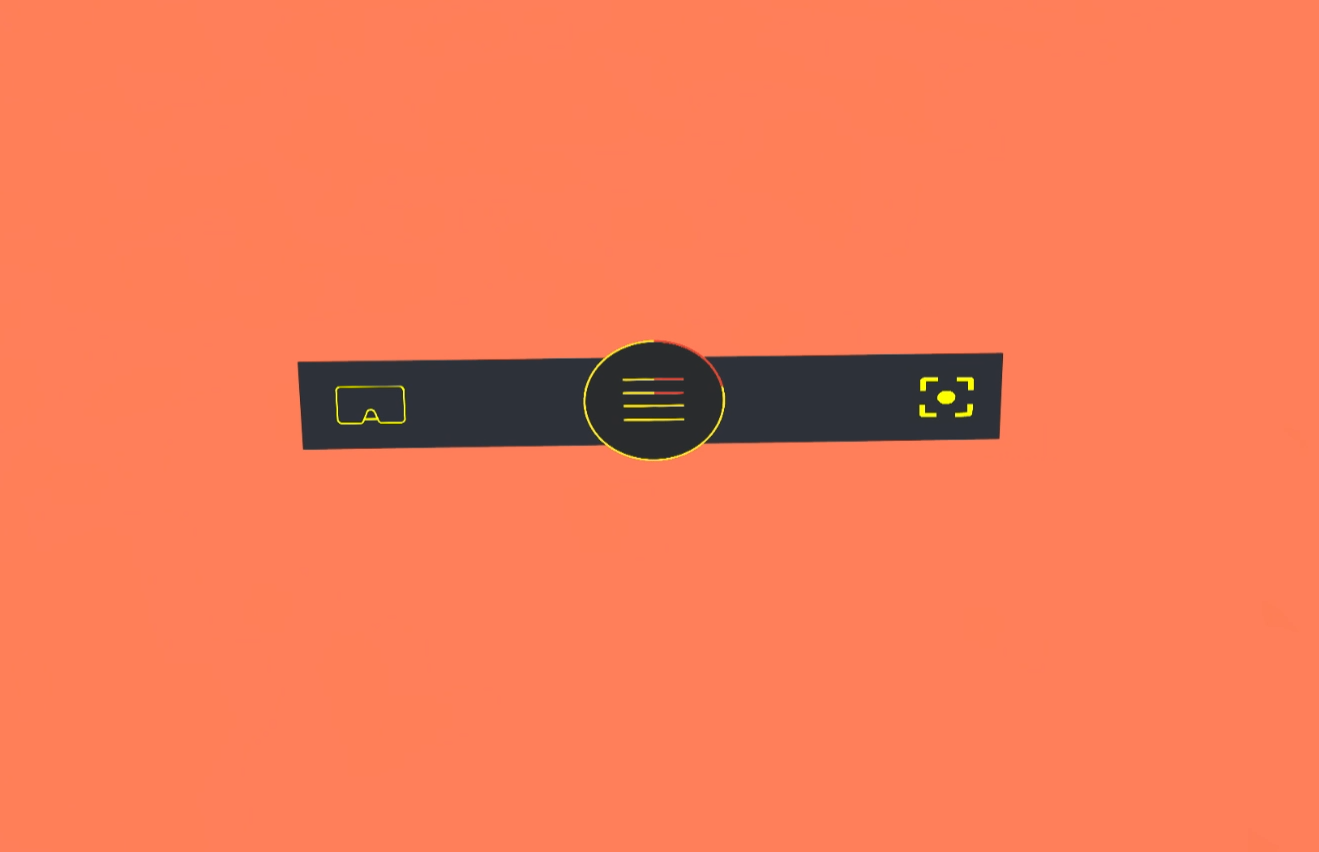
After selecting your character and bike avatars, you will be taken to the home environment. The home environment is a place you can always return back to after biking in different available environments. While biking, you always have a menu panel that you can access by looking down. This panel has three menu items with different functionalities.
The right menu item is used to recenter your view. Recentering your view is important to make sure that your avatar aligns in the middle of your screen with your physical bike. Anytime you notice that the avatar is not aligned, use this menu to recenter it. To recenter, select the menu, a countdown timer will appear. Make sure to keep your head straight and look forward towards the middle of your bike. When the timer reaches 0, your view will recenter to where you are looking at.
The left menu item is used to switch views from third person view to first person view. Switching to first person view mode gives you the experience of actually riding and controlling the virtual bike. From our testing and experience, this mode might not be comfortable for most people new in VR as there is a chance of getting dizzy during turns. The third person view mode gives you a wider view angle of the environment and is more comfortable for new VR users.
Tip : For Oculus Quest users, recentering your view should be done with the oculus quest controller.
The middle menu item is the main menu. This is where you access different activities and settings of Blync. When opened, you will first be presented with the activites menu. This tab shows you the games that are available and environments that you can explore.
The events tab shows you all events that are running or upcoming events that you can join. Events can be public or private. If you are invited to a private event, it will show up in your event 'participating' section.
The community tab shows you environments that are created by the community. You can view and explore community created environments or you can create yours and upload.
The settings tab is where you can adjust different settings to suit your VR device need. You can boost graphic settings, change audio settings or adjust your controls
Tip : More info will be available on how to design and upload your own environments.
We will visit more on the current activities and games that you can play in Blync in a future article. We do plan to keep improving the platform with more activities and updates based on your feedback. Stay tuned for more info.